|
V2 comes with the new style panel.
The style panel enables you to build up your own style library, and apply it at any time to any items. If you don't find it, make sure it is V2, it is in designer mode and it is on from the View/Style menu.
UI overview:
By default the source is "User Local Styles", which is the MG_PickerStyle folder in MG_PickerData from your document directory.
Press the  button and hit the configuration button, where you can manage your own style source directory. button and hit the configuration button, where you can manage your own style source directory.
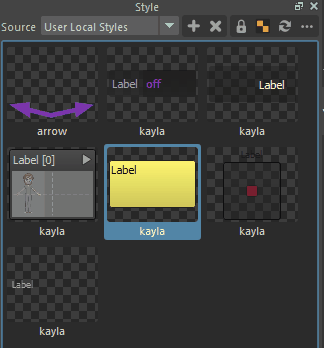
Press the  button to create a style from the picker selection. If you select multiple items, it will record the style from items of different types, and group them as a "Style Family". As shown in the image above, we got style family called "kayla", and it contains styles for many item types. button to create a style from the picker selection. If you select multiple items, it will record the style from items of different types, and group them as a "Style Family". As shown in the image above, we got style family called "kayla", and it contains styles for many item types.
Press the  button or Delete key to remove a style from the library. Selection is needed for the removal to work, you can use MMB+Click to highlight the style items without applying them. button or Delete key to remove a style from the library. Selection is needed for the removal to work, you can use MMB+Click to highlight the style items without applying them.
If the  icon is on, when applying styles to selected picker items, it will only apply a style to those items that match the style item type. icon is on, when applying styles to selected picker items, it will only apply a style to those items that match the style item type.
Turn on/off the grid display with the  button. It is the only to see the effect of semi-transparent items. button. It is the only to see the effect of semi-transparent items.
Hit reload button if you manually change the library outside the tool.
In the menu of there are more features, like browsing the current source directory with the OS file manager or loading the preference dialog for style source directory configuration.
Style application and editing:
Select some picker items, simply LMB clicks on style items to apply them. If there seems no change, check the item type, style type, and the type match toggle .
The MMB click will only impact the style item selection without applying them, it is mainly for style item editing.
With the style items highlighted, hit F2 to rename them.
 The style may contain one or more images. On application, it will copy the images to the picker file directory and may warn you if files with the same image names already exist. The style may contain one or more images. On application, it will copy the images to the picker file directory and may warn you if files with the same image names already exist.
|